
Get Your FREE Woodworking Guide Today!
Wood art projects can be an awesome way to give your home a touch of personality, creativity, and a little handiness. This is an article that goes over 10 creative woodwork art projects that you can easily do following different décor options in your living space. From quick simple builds to the complicated undertakings, there is a project for everyone. Each project takes off intending to make you turn the raw wood into a fine piece of work, really one of a kind.
1. Geometric Wall Art
Geometrical designs are modern cult home decors with clean, striking lines and shapes that can make the space feel modern and classy. By this way of arranging geometric patterns with wooden in the form of strips, you get interesting geometrical shapes that can appeal to any of your rooms.
Materials Needed:
- Wooden boards or scraps
- Saw
- Use of glue for wood
- Emery paper
- Paint or stain
Method:
Cut the wood: Cut the wood into geometries. This can be done using a table saw or a miter saw to get clean cuts with precision in the angles. Use sandpaper to rub all the edges of each piece to make sure that it is not rough and will have a clean finish.
Assemble components—Spread the components on a level surface and experiment with several configurations until you like one.
Glue components—Once you have a version you like the look of then glue the various parts together. Let it dry completely before moving it around.
Stain or paint finished product according to your preferred decoration. You may choose one color—for a clean and simple end—or choose many colors for a tantalizing mainstay.
Pro tip: If you want some depth, you could use smaller pieces of wood to create the sections of the geometric figures in multiple levels above the flat bottom surface.
2. Wooden Quote Signs
Inspirational Quote Signs – If you really want to bring inspiration and good attitude inside a place, a wooden-man quote signs from solid wood are perfect. Whether you want to show to the public your favorite sayings, leitmotif quotations, family names, the following signs will just deftly add a heart-warming touch inside a kind of place. Plus, easy to customize and perfect for gifting.
Materials:
1. Wooden board
2. Paint or stain
3. Stencils or vinyl lettering
4. Sandpaper
How to Do It
Sand the wood board to be adequately prepared for painting or staining.
Painting/Staining the Board: You can paint or stain your board solid colors, ombre, or go even further into the most popular distressed.
Add the Quote: Once the finish is dry, add the quote you have picked out using stencils or vinyl lettering. Make sure to center and space the letters correctly for a nice clean, professional finish.
OPTIONAL DISTRESSING: Lightly sand the board edges or do a dry brush technique to give it that vintage or rustic look.
Tip: If you’re feeling a bit artsy, go ahead and add some embellishments like little wooden flowers, metal accents, or even a painted border which will further make the design more interesting and beautiful.
3. Wood Burnt Art
This technique, generally putting intense heat on wood to sear it with designs, is also called pyrography and is considered one of the oldest. The kind of artwork involved is brilliant is making images or even portraits very detailed by searing the details on the wood.
Materials
• Wooden board or plaque
• Wood burning tool
• Fine sandpaper
• Thin varnish or sealant (optional)
Instructions
Make Your Wood Ready: You should always sand the wood surface to smooth it and avoid splinters and blemishes. A smooth surface is perfect for good detail.
Create Your Design: Either on the wood area where you want to execute the design—a very light sketch made with a pencil—or trace an outline likeness to the surface from a printed image, using carbon paper.
Burn the Design: Start burning right on top of your design with a good wood burning tool, applying uniform pressure so that the lines are uniform, both in thickness and shading. Be content with experimenting using different types of tips and processes that bring out detailed results and textures.
Finish the Project: As soon as the design is done, smooth out the jagged edges and put a coat of varnish or sealer so damage is prevented and the real beauty of the wood comes out.
Tip: Get to know the wood-burning tool and technique by working on a junk piece of wood before executing on the final work.
Get Your FREE Woodworking Guide Today!
4. Wooden picture frame
Make wooden picture frames to frame your photos and art. They can be made to any size and design, from the simplest of rustic and aged to super modern and clean. They are also another great way to use up those Sherwood Forest cuts remaining from other projects.
Materials Required:
• Wooden strips
• Saw
• Wood glue
• Clamps
• Sandpaper
• Paint or stain
Instructions:
Miter cut 45-degree angles of wood strips to the dimension of the picture to frame. For a professional look, miter the corners with a 45-degree angle. Spread a liberal amount of wood glue across the miter joint and clamp the pieces together. Test to make sure that the corner of the frame is square by measuring diagonally from corner to corner. Allow the glue to dry completely.
Sand the frame. After everything is glued and dry, sand the frame for a smooth application of finish.
Next, Stain or Paint: Finish by applying stain or paint to co-ordinate with your own decor. Maybe in carving some detail in the frame or maybe in some inlays that you do in a layered paint technique, that would be really unique.
Mount a backboard and glass to protect your photo, and consider adding some hanging hardware so it is ready to be hung on the wall.
5. Abstract Wood Art Panels
Abstract wood art panels will create texture and dimension for any wall. Placing varied size and shape of wooden boards on a backing board will make a very impressive piece of art for a room.

Materials needed for this project:
• Boards – Different size of boards sized differently
• Saw
• Wood glue
• Sandpaper
• Paint, or stain
The Process:
Cut the Wood: To start making the DIY wall art at home cut, the pieces of wood into parts of different shapes but with various sizes. Think about how the different parts will fit to achieve a nice, dynamic composition. Sand the Edges: Sand the respective edges of each using a sandpaper to allow you to piece up the other parts without a problem.
Design: Splash the different sized elements on a surface and rotate and experiment on possible design concept Consider layering some of the elements down to add some contrast to the work .
Glue: After the design is final place all the elements on to a back board or surface you are using and glue to completion. Allow the glue to dry.
Finish the job : a finish off the whole piece with paint or stain, or go the other direction, and leave one part of the piece blank as to create a focal point. Be sure the entire finished piece looks like one cohesive design that would add some of the elements of artwork to your room.
Grind : Finally, use contrasting colors are contrasting finishes to the highlight elements of the design piece. This will make the project appear more dynamic and interesting.
VI. Art in Reclaimed Wood
Reclaimed wood adds to your art an air of old-world charm that is both in style and classic at the same time. The wood isn’t only a sustainable thing to do, but it gives an item history and character that a newly minted piece of wood just can’t. Whether it is old barn wood, pallet wood, or just scraps of wood left from yet another project, this reclaimed wood brings to your art that old world charm that never goes out of style.
Materials
• Reclaimed Wood
• Saws
• Nails or wood glue
• Sandpaper
• Paint/stain (optional)
• Hacksaw, jigsaw
• Paintbrush
• Ruler
Instructions
Prepare the Wood: Sand and clean the reclaimed wood ostensibly to remove any dirt, nails, or roughness. You would be aiming to retain the wood character and at.
Cut to Length: Whatever the length of wood you’ve inserted, each should be cut into the sizes as per your pattern. Different lengths, different widths, and different thickness could be utilized for a great look and stylish statement.
Pattern the Design: Put all the cut pieces in the pattern you want – the herringbone, random grouping, grid, or any other.
Frame the Artwork: Attach by placing a frame on the well-done edges with the help of glue or nails. If one needs to have a better finish, he can put a frame to close the edges.
Optional Finishing: For doing a finished look by design, you can keep the color of the wood natural, pre-stain to even out the coloring, or final clear coat to protect the wood and add a natural shine.
Pro tip: Use the imperfection in the wood—the knots, the nail holes, the weathering of the material—to give it its character and authenticity.
Get Your FREE Woodworking Guide Today!
7. Mandala Wooden Art
Mandalas are really hip because of their geometric pattern, and they’re symbolic of integration, harmony, and balance. In this step, a wooden mandala appears to give your home these hip qualities and brag about your creative talents.
Materials:
• Wooden board
• Paint, stain or carving tools
• Sand paper
Instructions:
Prepare the Surface: Sand wooden board to a smoothness with which you are satisfied and ready to take on paint or carving.
Design Implementation: Using a template, draw or transfer a mandala des on your piece of wood. Find templates online on websites; create your own design but make sure it’s symmetrical and lots of focus on being well-centered.
Carve or Paint: If carving, very carefully, with a small carving tool, begin to carve along the lines of your design. To paint, use fine brushes, applying paint on to in a steady, controlled manner.
Finish Off the Project: Sand down edges, and then seal the work, if what the user would want the seal to do is to secure the wood and make sure the mandala is beautiful for several years down the line.
Hint: What one can make use of are combinations of carving and painting which add depths and contrasts that ultimately give a more complex look to the mandala.
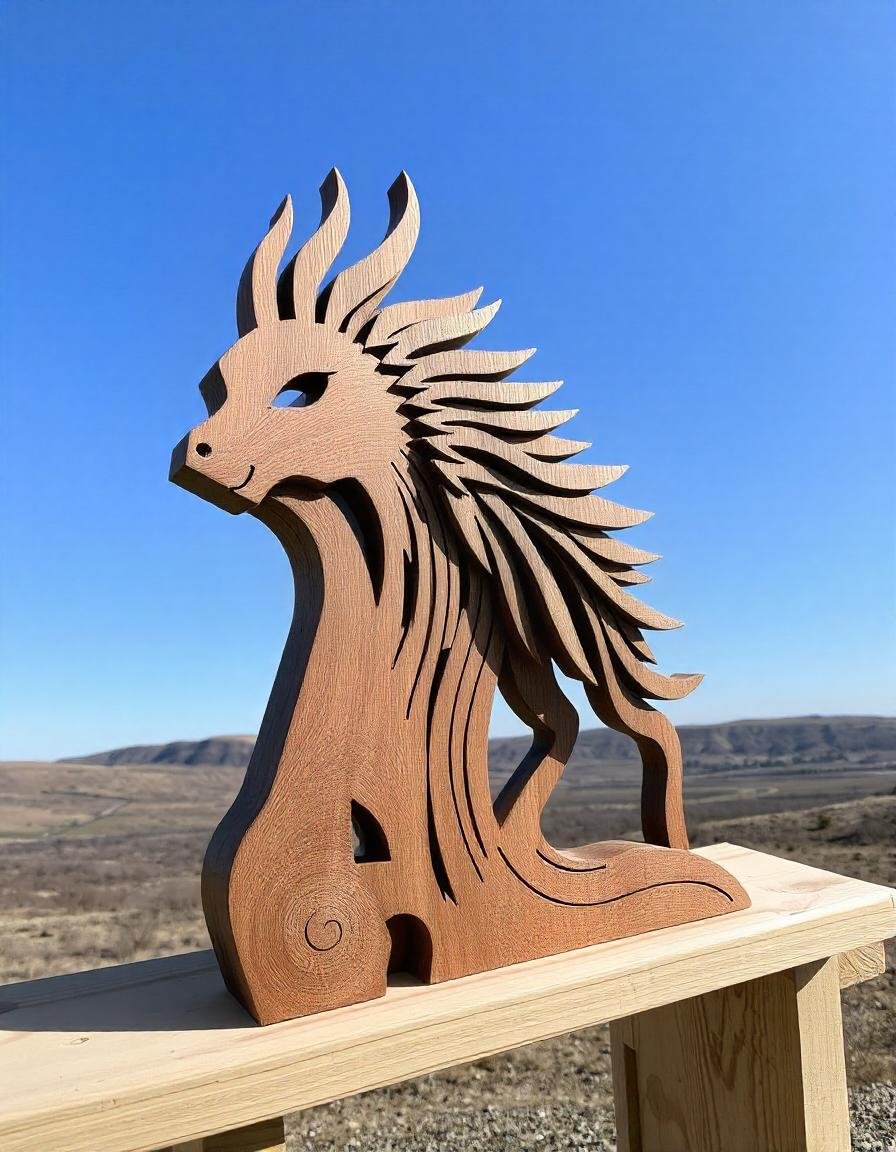
8. Wood Carvings
The wooden sculptures can be composites of highly detailed realism; there are plenty of opportunities to articulate creative expressions with the wooden sculptures. Any sculptures can be a centerpiece in a room that gives your home some kind of artistry and work.
Supplies:
• Blocks of hardwood
• Carving tools
• Sandpaper
• Varnish or sealant
Instructions:
Select of Wood The first process of making a wooden sculpture. You will need to kick off by choosing a piece of hardwood to make into your sculpture. Some common types of hardwood that could be suggested are oak, walnut, and mahogany.
Design Planning: Sketch on paper your sculpture design you have in your thoughts or right on your wood piece, taking into concern the grain direction and what it does to your chosen piece.
Carve the Sculpture: Use your carving tools and start working methodically to chip away wood until your desired form is exposed. Use larger tools to define general shape, and then finer tools for detailed work.
Sand the sculpture: Following the carving, he should sand the sculpture. In this way, the surface becomes perfectly smooth to remove any uneven forms left in the wood. Finish the piece: Varnish the sculpture with varnish or other sealant material in order to achieve that protection of the wood, to bring out the natural color, and to open up the grain. This would also give the sculpture the look of a polished and finished piece.
Tip: The touch is that to texturize and finish the sculpture, you must leave some areas raw and rough without any treatment and apply a patina on it. You’ll end up with a very lively sculpture, full of character.
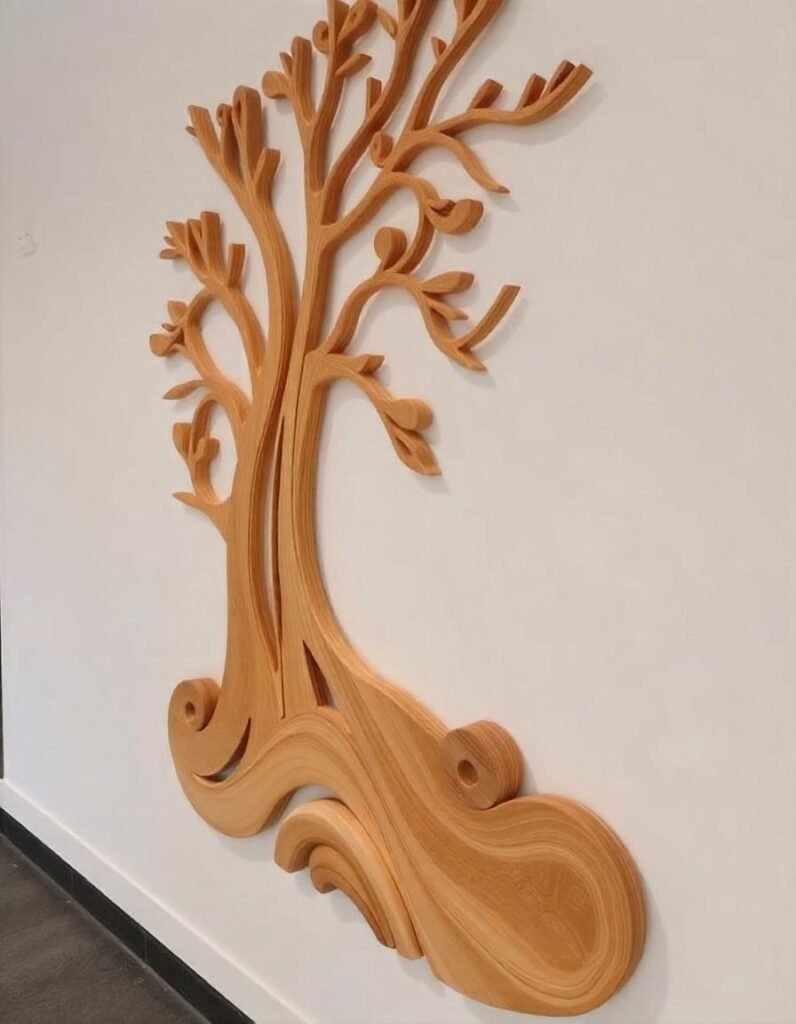
9. Wooden-wall murals
Create a wooden wall mural. This is a creative, bold idea to convert a rough and uninviting wall into a wonderful piece of art. These creative works can be as simple or as complicated as desired, worked up according to the mood or any particular design.
Materials Needed for a Base Presentation
• Wooden panels, or planks
• Saw
• Wood glue, or nails
• Paint, or stain
• Sandpaper
Directions:
Design Your Mural: Lay out your mural design on paper in relation to the size of the wall and the overall aesthetic to be created. Equate how the variety of different wood colors, textures, and finishes create a whole perfect look, and then take inspiration from that. Think your idea over one more time and only then proceed with it. Cut the Panels: Cut the wooden panels or planks into desired sizes and shapes according to your design. Sand the edges for a smooth fit in place.
Plan the Panels: On the ground, prepare all the panels with the only objective of making sure that they will perfectly align as designed. Make all the necessary corrections beforehand.
Put the Panels On: To actually attach the panels to the wall starting from the bottom row, either glue them on with wood glue or nail them. Continue up the row by creating an actual row with a level for each individual panel.
Finish the Mural: Once the panels are in place, you can continue and paint or stain the mural to bring an added dimension of beauty. Apply a mix of finishes on the mural to increase depth and interest.
Tip: A wooded clock can sit at different layers, with metal, mirrors, or fabric for a more exciting appeal.
Get Your FREE Woodworking Guide Today!
10. Wooden Clock
A stylish yet functional décor, the wooden clock simply speaks of mastery in every element the room possesses. Without any verbal energy, any room is transformable to livelier elegance with a hint of woodworking mastery. It doesn’t matter how complicated the design is—making a wooden clock can be a smooth exercise in shedding more of the skills required in making timepieces.
Materials
• Clockworks part
• Wooden board or panel
• Paint or/and varnish
• Sandpaper
• Drill
Instructions
Design the Clock: Decide on the shape and size of the clock. You can either try the traditional shape of a round or become a little creative with some abstract or geometric design.
Cut and Prepare the Wood: Cut into size and shape the required wooden sheet. Sand the edges to smooth it. This is in preparation for finishing.
Clock Machination Hole: In the center of the board, drill a hole to the size of the clock machination. Make sure that the size of the hole is appropriate to pass the shaft through properly.
Finish The Clock Face: Paint or varnish the clock face as desired. You can add numbers, markers, or any kind of decoration that may give flare to the face of the clock.
Install the Clock Mechanism: Install the clock mechanism on the back of the board, insert the hands, and set the time. Follow the manufacturer’s directions for installing the mechanism.
Pro tip: Remember that you can have more decorative elements added with metalized numbers, in-laid wood, or painted designs, giving your clock the chance to become more impressive and unique as it really is a design of smart hands.
Final Words:
Get the following and prepare everything up, with these full, detailed instructions from start to finish, preparing to make your living space come alive with wood art, along with the display of your skill. As you work on the projects, you will come up with something beautiful, useful, and of course get equipped with the skills and experience that will motivate you to maintain this great host of array options to work upon your wood.
Get Your FREE Woodworking Guide Today!