
Click Here and Get Your Free Combo Guide on Tips for Woodworking

In this ultimate guide, we will go through many Christmas wood projects you can do, from simple decor to complex gifts—anything that can be made with unavailable materials and tools. So, take out those woodworking supplies, turn on your most awesome holiday tunes, and let’s make some Christmas magic.
Why Christmas Wood Projects are Great
")
Timeless Appeal: Wood is an inherently chatty medium of tradition and permanency. It is the perfect medium for Christmas projects. The natural warmth and texture of wood mesh well with the holiday’s nostalgic ambiance. Wood decorations, such as hand-carved Nativity scenes, rustic Christmas tree ornaments, or exquisitely carved Advent calendars, do bring out the impression of ageless time that plastic or synthetic material simply cannot compete with. Wood carvings have become cherished family heirlooms, being passed down from one generation to another, hence, creating an esteeming connection of a Christmas of long ago. The earthy sensibility that comes with the organic feel of wood speaks to the natural elements so many people associate with the holiday season, making it an ideal material for those on a journey to build a warm, inviting environment.
Personalization: Perhaps one of the most satisfying activities when creating Christmas wood projects is personalizing the pieces to either fit a personal taste or fit those for whom the project will be gifted. Personalization options seem almost endless: the type of wood chosen, finish, and level of details to be included—from the name, date, special message, etc. Whether it’s Christmas ornaments, signs for businesses, or gifts, personalized wood carries an identity that mass-produced products cannot come close to. That makes the items designed by an individual absolutely unique, so they can be cherished for a lifetime. Another great advantage of personalized gifts is that your thoughtfulness and caring effort can just make anyone feel special during the festive season.
Eco-Friendly: Since wood is a renewable resource, it’s one of the most environment-friendly products one can use for the various Christmas projects. Just imagine all the beautiful decorations and gifts you could possibly make, saving on waste with the use of reclaimed wood or purchasing only from sustainable sources. This eco-conscious approach to holiday crafting doesn’t only reduce waste but places even more meaning into your projects. Since you do know the ornaments and presents are going to be sustainable, they are all the more precious to you. Therefore, it is easy for your holiday celebrations to reflect concepts of conservation and stewardship. Plus, wooden items tend to last longer than those made out of less hardy materials, so they are not as likely to end up in the landfills after only one season.
Durability: Wooden decorations and gifts can last forever. Unlike most of the store-bought plastic or other more brittle creations, the wood ones can stand the test of time. By giving proper care, your Christmas wood project could experience several holiday seasons. They are very likely to become part of the family tradition and to survive from one season to the next as one of the favorite season symbols. This durability not only increases the value of what you are creating but also ensures that all of your invested time and effort in making these objects will be adequately paid off. Just imagine the pleasure of pulling out a wooden Christmas ornament or Nativity scene year after year, each time infused with the memory of holidays when it was first created or received as a gift.
Top Christmas Wood Projects to Try This Year
Wooden Christmas Ornaments:
Reasons They’re So Popular: In all honesty, wooden ornaments are a classic in a collection of Christmas decorations. They are simple to execute, easily personalized to a great deal, and give that rustic handmade-look charm to your Christmas tree. Whether carving or painting, they will stand out from the often mass-produced ornaments, and that personalizes your holiday decor. They also can come in different shapes and sizes, and some can be quite elaborate while others remain humble to resemble natural wood. This, in turn, presents an amazing project that is suitable for all skill levels from beginner to expert.
Click Here and Get Your Free Combo Guide on Tips for Woodworking
Project Ideas
Carved wooden stars or snowflakes
Painted festive designs on wooden baubles
Wooden reindeer or Santa Claus cutouts
Personalized wooden name tags for family members
Wooden angels and doves symbolize peace and goodwill
Advent Calendar
Why It’s Cool: Not just an Advent Calendar made of wood and paper, respectively, but an artistic advent calendar, one that provides a lifetime’s worth of enjoyment. Unlike the flimsy versions in paper or plastic, a wooden advent calendar has permanence and can match with your holiday decor to blend in with the other pieces. On top of that, the wooden made Advent calendar can last much longer because it is reusable.
Project Ideas
A wall-mounted wooden Advent calendar with compartments for treats or surprises
An advent calendar: a tree-backed one with ornaments marked for each day
An old-fashioned ladder advent calendar—one that has pouches or pockets
A rustic wooden advent calendar with drawers or boxes to hide small presents or messages
Minimalist Scandinavian design—simple lines and natural wood tones
Nativity scene
Why It’s Meaningful: To many families, the crèche is the heart of their Christmas decoration—perhaps the single symbol that represents the actual meaning of the season. Building a wooden Nativity set allows you to represent your faith and creativity in materialized form, making figures sure to be loved across the generations. A hand-carved Nativity scene, from very traditional and detailed figures to minimalist, very modern, in style, will be absolutely breathtaking in beauty of artistry and devotion, bringing the story alive for you in a very individual, unique way. Be it detailed for a traditional scene or a very modern, minimalist style, a wood Nativity set will make the Collectors
Weekly list of holiday decorations that you cherish year after year
A hand-carved manger scene of Mary, Joseph, Baby Jesus, shepherds, O, and the Wise Men
A very simple, stylized, made-of-wood manger set
A cutout of a manger scene framed by the star over the stable, hanging on the wall
A manger set in which you can change the people to add more each year
Reclaimed wood, rustic, vintage, special-occasion, religious-themed manger scene
Christmas village
Where to Use It: A Christmas village is always such a sweet piece of holiday decor, with tiny buildings and trees. They have a timeless look, especially when crafted from wood, with all the details highlighted with light and more. Most wooden Christmas villages make great pieces for a mantel, a table, or even under the Christmas tree. The beauty of making up your own village is that you can expand it as much as you want to; in the size that you want and can keep adding pieces to it every year till you have built up a unique set for yourself. This is just the right project for people who like to add a bit of creativity and imagination to their holiday decorations.
Project Ideas
Charming wooden houses with cut out windows well suited for lighting effects
A wooden church with a steeple and bell
Wooden trees, snowmen and other carvings to finish off the village
A rustic log cabin village for that warm, rustic touch
A minimalist modern village with clean lines and geometric shapes
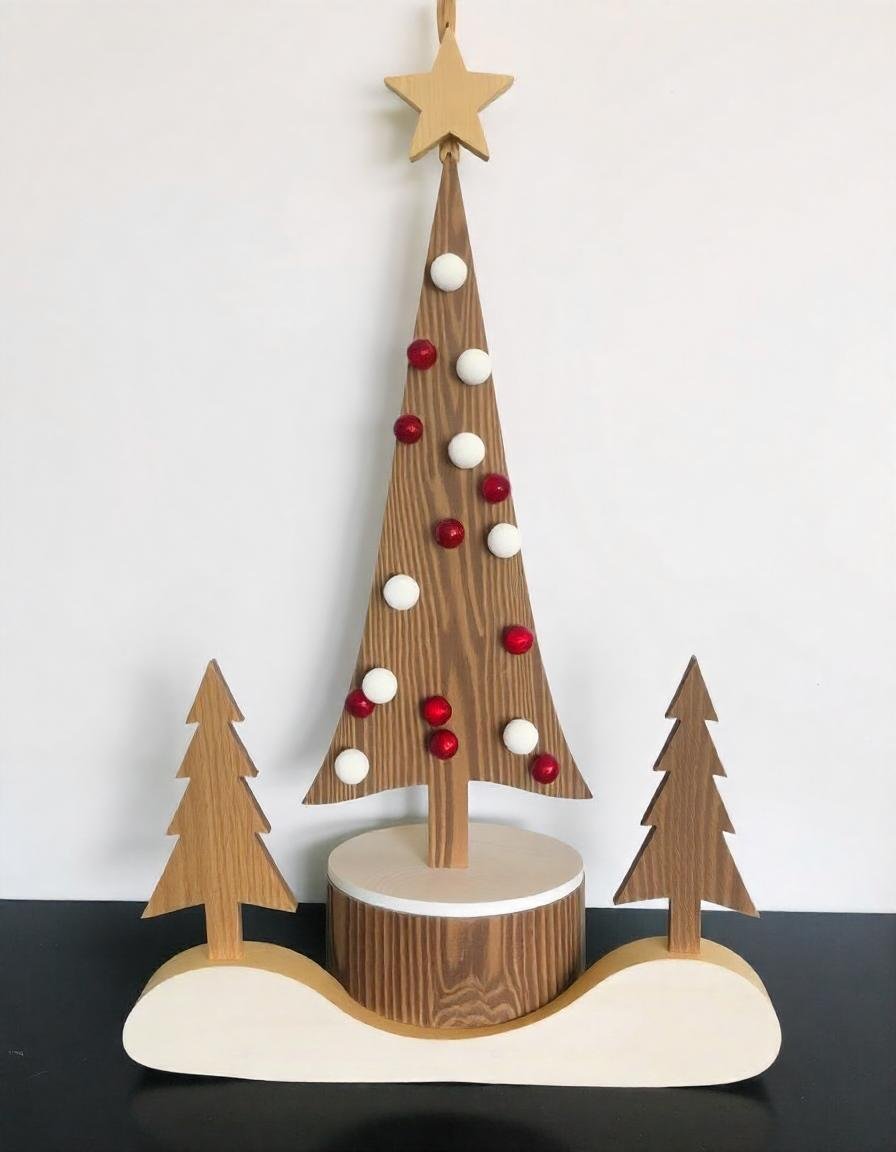
Christmas Tree Stand
Why It’s Cool: A custom Christmas tree stand not only displays your tree beautifully but also acts as a functional and decorative base to enhance the décor of your home. It is your chance to make your stand the appropriate size and style of the tree so it fits the space in your room. Nothing at all in your holiday decorations are going to be more unique than a handmade wooden tree stand. A quality tree stand will also allow your tree to be more stable and supported, meaning it stands tall and strong throughout the holidays.
Project Ideas
A traditional log-style tree stand with raw, bark edges
A minimalist tree stand – designed using simple design elements
An embellished stand, such as one with carving or painted detail
A tree stand including areas to hide storage for your Christmas ornaments or tree lights
A personalized tree stand with the family name or any special holiday message inscribed or painted on it
Click Here and Get Your Free Combo Guide on Tips for Woodworking
Materials and Tools for Christmas Wood Projects
Choosing the Right Wood: What type of wood you will be using will very much determine the look, feel, and even the longevity of your piece of work. Some of the most common are:
Pine: A softwood that can be relatively easily worked with and is highly abundantly available in the market. It is perfect for making small decorations and ornaments.
Oak is a hardwood that is strong and rugged and excellent for bigger projects, such as Nativity scenes or tree stands. Birch is a light-colored hardwood with a very fine grain for a project that will be super smooth and polished, excellent for projects like Advent calendars or painted ornaments.
Reclaimed Wood: Other than this futuristic elegance, the material also imprints a history on your project—customarily rustic or vintage. Reclaimed wood could be used to incorporate a natural wear and patina into your projects, producing a distinctive aged appearance into your projects that would transport character and warmth into your projects. Tools
Saw: For cutting some of the more intricate shapes when making things like ornaments or figures for the Nativity or the village houses, you have a jigsaw or a scroll saw. A table saw can be used for making straight or longer cuts in the stock.
The cordless drill is versatile for making holes when assembling pieces or adding hardware. The drill press allows for hairline accuracy with holes, mostly in thick bits of wood.
Sander: The power sander creates a smooth finish and works on bigger surfaces, whereas sandpaper is sufficient to take care of the smaller jobs. Next, for more minute working, the rotary tool employs such sanding attachments to smoothen up tight corners and intricate designs.
Chisels and Carving Tools: A good set of chisels is needed to accomplish any work of detailed carving, especially if you are planning to make a figure or decorations with great detail. Gouges and carving knives also come in very useful for texturing and detailing one’s projects.
Clamps: They are very important in pulling the pieces together with a strong bond while the glue is setting. Depending on what size or shape of project you have, bar clamps, pipe clamps, and spring clamps can come in quite handy. Mini clamps or maybe a hand clamp for smaller pieces are nice to hold things in place while you work.
Choose Your Design: Of course it all begins with choosing an ornament design. Some popular choices include: stars, snowflakes, reindeer, and Christmas trees. Sketch out your design idea or search online for a template. Feeling creative? Consider designing your own shape or pattern—this way all of your baubles will be completely one-of-a-kind.
Prepare the Wood: Choose your wood—one of a suitable type such as pine, or birch plywood, and cut it down into pieces that you are able to handle. Make the wood smooth and free of knots or defects that may interfere with your design.
Transfer the Design Pencil draw the design onto the wood. For accuracy, especially on intricate designs, you may use a stencil or template, and hold it in place with adhesive, pressure-sensitive masking tape while you trace along your design. On intricate designs, you may copy your design by tracing it onto carbon paper, then transferring the image to the wood.
Cut out the Ornaments: Using a jigsaw or scroll saw, cut the ornaments very carefully following the lines of the design. Cut out the ornaments of your design carefully, especially if it is more detailed.
Sand the edges; slightly sand the edges after cutting to remove the distasteful spots of the material and make it finish-ready. Smoothen with fine-grit sandpaper for better contact finishing or use a power sander for large pieces.
As much fun as making the decorations, now came the actual accenting. You might want to paint them in festive colors, douse them in glitter, or even create intricate designs with a wood-burning tool. Personalize them with such things as names, dates, or holiday sayings. Or, again, use different finishes in staining or whitewashing to make it look your way.
Finish and Protect: Varnish or polyurethane finish applied to the ornaments will further protect them from deterioration and enhance the beauty of the natural wood. The finish on wood seals the wood from things like moisture that would tend to tear it apart, thus ensuring your ornaments will be there for very many holiday seasons.
Add Hangers: Using your hole punch tool, make a small hole at the top of each ornament die, threading a ribbon, twine, or wire for hanging. You can also add small hooks or eyelets if you want them traditionally done.
Customize Your Christmas Wood Works

Personalized Gifts: Personalized wood gifts speak a special language no mass-produced item could ever come close to. Mark those designs with names and dates for wooden ornaments or design a personalized Nativity set. Personalized presents are appreciated by everyone because it makes the recipient feel that they are special and that you have given in some time and energy to prepare not just ‘anything’ for them. Be it a set of wooden coasters, each one monogrammed with the family name, a hand-carved sign with a favorite holiday quote, or a custom ornament featuring a child’s name, the gifts will be cherished forever.
Decorations with themes such as rustic Christmas, Scandinavian winter, or vintage holidays can be made. Coordinate colors, finishes, and design elements so that everything seems to work together in a seamlessly cohesive holiday embellishment. For instance, in a rustic theme, think about incorporating reclaimed woods, natural finishes, and earthy colors. For that Scandinavian look, think of minimalist designs, light wood tones, and simple, elegant shapes. A vintage theme might include distressed finishes, retro patterns, and nostalgic motifs. Next, you unify the same style of sticking to a theme, enabling you to have a distinct and orderly look that ties all your decorations together.
Add Lighting and Details: Bring your wood projects to life by incorporating lights, embellishments, or any other ornamentation. For instance, make tiny holes in a wooden Christmas village so as to place LED lights that create a warm inviting glow. Use fabric, felt, or ribbons on ornaments to have a mixed-material effect. You can also experiment in work with different textures and surfaces, for example, to add some metallic touches, use chalk paint for a matte surface, or perhaps distress the wood for a more aged effect. Detail like this will also give a level of depth and visual interest to your work, really setting it off.
Click Here and Get Your Free Combo Guide on Tips for Woodworking